Mix room
Layer stacks
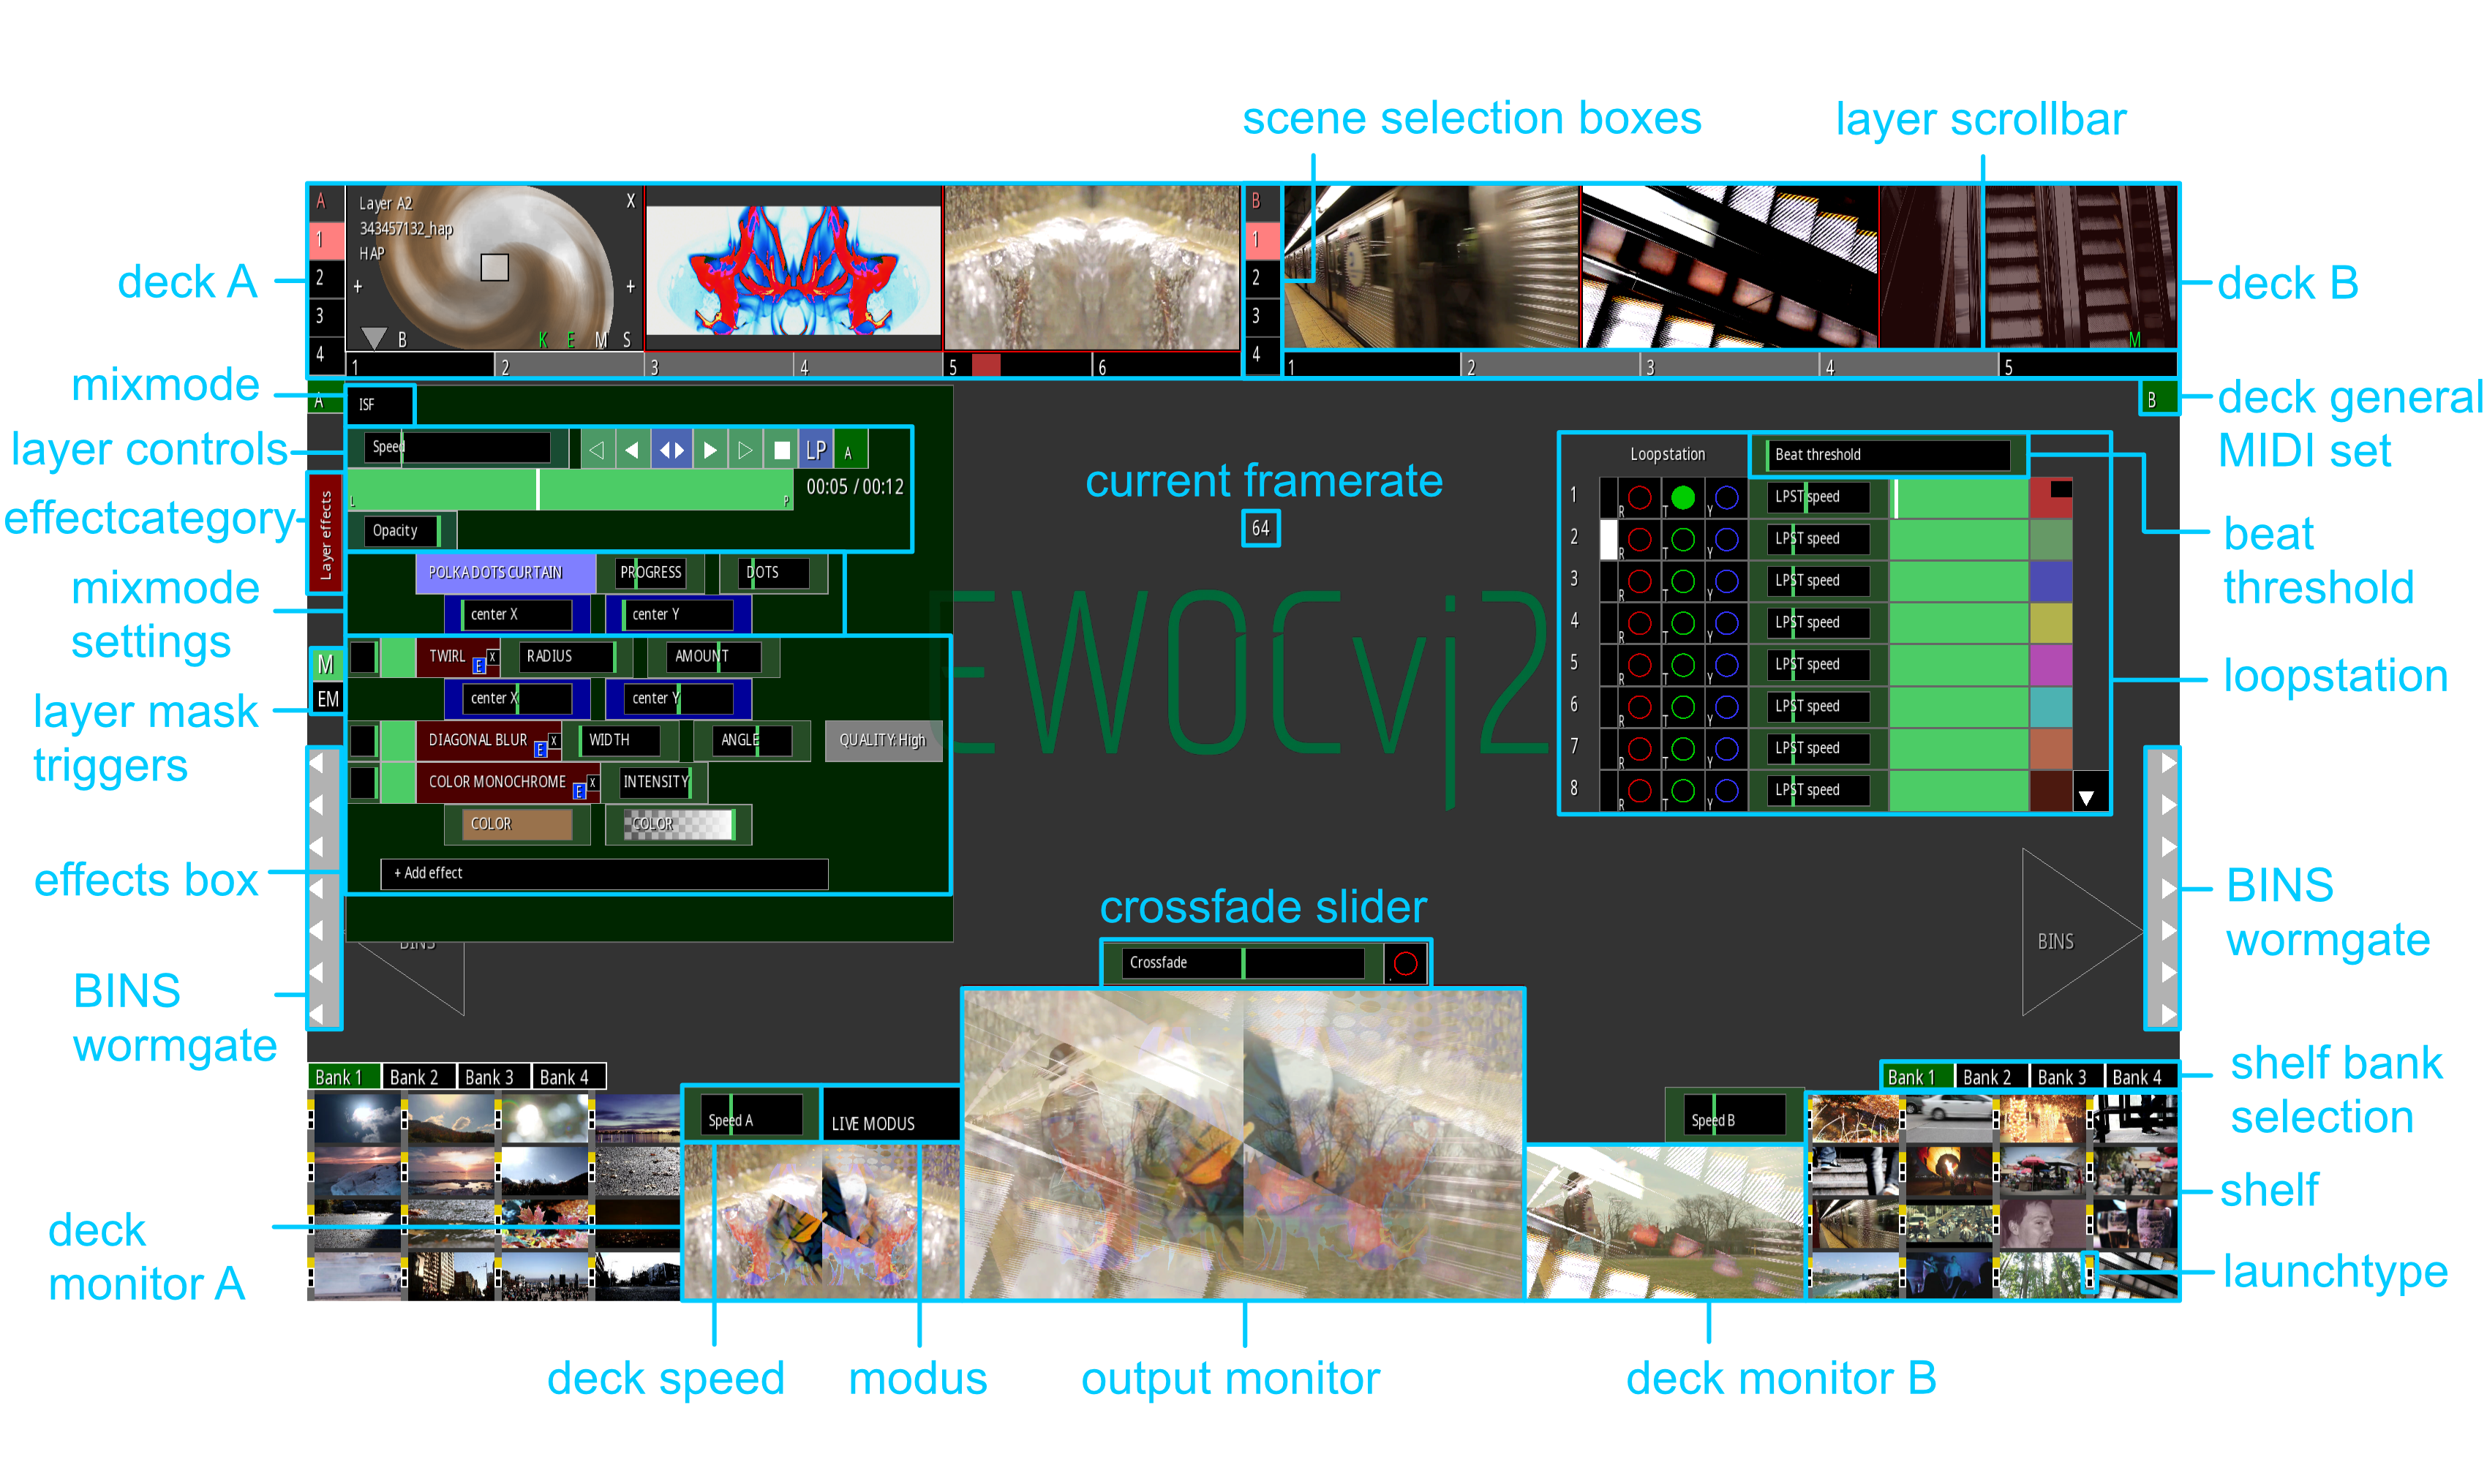
Along the top of the screen are the monitor lists of layers that constitute the main program video mix structure. There are two layer stack lists, one on the left (called deck A) and one on the right (deck B). These two constitute separate stacks of layers, which afterwards are combined into one A+B video preview/output, like a DJ combining two songs into one mix.
The first layer of each stack, which lays on the bottom of that stack is positioned on the left of the list. Each following layer is put on top (over) the combination of layers below it, using a certain mixmode or wipe (see 4. Mixmode/wipe) that prescribes the method of combination.
Each layer is made up of a video source (video, image, webcam input, source plugin or NDI source), its mixmode, and the video effects that are used to change certain video characteristics (see 19. Effects box). The image viewed in the layer list monitors is the result after all effects have been applied on the video source.
When a new project is started, there are two rectangles displayed in the layer stacks one on the left and one on the right; they are empty layers (transparent) that serve as a starting point for the project. Hovering the mouse over a layer monitor will select that layer as the current layer and its settings will be displayed in an overlay "HUD". This selection by hovering is the default behaviour but you can set this to require a left mouseclick in the preferences window. Right clicking a certain layer monitor views accesses its layer menu.
It is possible to reorder layers. Two possible operations, moving or swapping. To move a layer, left click + drag it (make sure not to click on the pan box) and anywhere between or just next to another layer monitor box and drop it there. A light blue box will appear signifying you are correctly aiming between and not onto another layer(s). To swap left click + drag and drop a layer in the middle of another layer monitor box. Those two layers will be swapped. Moving and swapping can be done between A and B deck or inside one off the two decks. One important detail: when swapping, the settings of the layers mixmode/wipe will not be swapped also. But when moving a layer, the layers mixmode/wipe WILL be moved together with it. To swap with mixmode/wipe change do two moves instead.
Every layer has its own clip queue, its a list of videos and/or layer elements that are played in succession. When one video reaches its end, the next will play. When the last video plays, the first will play again after it. Drag a video or layer from anywhere in the program over a layer monitor, and its clip queue will roll open downwards. Drop the new clip in an empty clip slot or replace an other clip with it (by dropping it on a clip in the queue) or insert it between two other clips in the queue. Use the mousewheel to scroll the clip queue up or down. You can drag’n’drop between clip queues also. When finished setting up clip queues left click anywhere in the screen to cancel queue setup. Also open any layer's clip queue by doubleclicking a layer monitor.
There always is an empty space at the right of the scroll stack. This empty area can be rightclicked to get creation options for an additional layer (at the end) and content can also be dragged intothis empty area.
Layer overlay HUD
The layer overlay heads-up-display shows:
-
Video/image file name or source plugin name
-
Video source category: HAP (hap encoded video), CPU (non-hap encoded video), IMAGE (image file), SOURCE (FFGL or ISF source plugin) or NDI (NDI input)
-
"+" button: creates a new transparent layer right after this layer; the first layer has a "+" button on the left too, to create a layer at the very start
-
"x" button: deletes the layer
-
"K" button toggle: when turned on (green) the masks of this layer are preserved when new content is loaded
-
"E" toggle: when turned on (green) the effects of this layer are preserved when new content is loaded
-
"M" toggle: mutes (temporarily disables) this layer
-
"S" toggle: soloes the layer - mutes all other layers
-
"B" toggle: turns on beatmatch switching for queue clips - choose the interval length in beats/bars from the menu that pops up
-
"TRIANGLE" button: opens/closes the clip queue of this layer
-
"SQUARE" handle in the center: left click + drag pans the layer image around. Double left mouseclicking the handle recenters the layer image. Holding SHIFT when panning constricts the pan movement to one axis. Rightclick menu allows "locking" pan and zoom: pan and zoom will stay the same when new content is opened in the layer.
-
Mousewheel zooms in/out of the layer image centered on the monitor center
Layer menu
-
“Connect live”: in this menu will display all possible live input sources (eg. a webcam). Clicking one will connect the source to the layer, displaying it. One same source can be opened in any number of layers.
-
“Open file(s) into layer stack”: will open up a file browser that allows you to open any number of video/image files or layer files into that layer. When multiple files are selected, you are dropped into the "ordering" list display. It lists all file paths to be opened accompanied by a thumbnail preview image. You can drag entries in this list up and down to change the order in which files are added; each additional file will end up in a new layer to the right (remember: higher up the layer stack) of the previous one. Click "APPLY ORDER" to confirm the order and open the files. Clicking right mousebutton here cancels the open operation.
-
"Open file(s) into queue": will open up a file browser that allows you to open any number of video/image files or layer files into the clip queue of that layer. Layer ordening options are presented (see previous paragraph).
-
"Insert file(s) before": will open up a file browser that allows you to open any number of video/image files or layer files BEFORE that layer. Layer ordening options are presented (see two paragraphs higher
-
"Use source plugin": opens a submenu with all installed FFGL and ISF source plugins. Choose one and that plugin will be set as layer video source. Each plugin has its own unique set of parameters.
-
"Select NDI source": pops up a submenu with all available NDI sources if and when there are any. Choose an input source as video sourcefor the layer.
-
"Toggle NDI output": toggles NDI output on/off for this layer.
-
"Aspect ratio": pops up a three-option submenu for aspect ratio of layer image:
-
"Same as output" stretches the image to the monitor bounds
-
"Original inside" preserves the original aspect ratio and fits the image inside the layer monitor bound
-
"Original outside" preserves the original aspect ratio and fits the image to just totally cover the layer monitor, possibly stretching beyond it in one axis. The aspect ratio of the layer monitor is a standard 16:9.
-
-
"Duplicate layer": duplicates the layer (with all settings) into a new layer to the right of it.
-
"Clone layer": clones the layer (with all settings) into a new layer to the right of it. Layers that are cloned always have the same frame number displayed and have identical speed values all the way. Other settings can be changed after the clone is made.
-
"Save layer": opens a file browser to save the layer as a layer file on disk. A layer file includes all control settings and also the layers effects settings. Default location is the "elements" folder inside the current project folder.
-
"New deck": totally erases the content of a layer stack (either deck A or B).
-
"Open deck": opens a file browser to open a deck file from disk. Default location is the "elements" folder inside the current project folder.
-
"Save deck": opens a file browser to save the current deck as a deck file to disk. Default location is the "elements" folder inside the current project folder.
-
"New mix": totally erases all layers.
-
"Open mix": opens a file browser to open a mix file from disk. Default location is the "elements" folder inside the current project folder.
-
"Save mix": opens a file browser to save the current mix as a mix file to disk. Default location is the "elements" folder inside the current project folder.
-
"View full screen": shows the layer full screen, mouse buttons and Esc exit.
-
"Show on display": pops up a submenu with all available external displays (do note display devices are not hotpluggable during program execution; you will need to cennect them before running the program). The layer image will be shown full screen on this device.
-
"Record and replace": waits for the video/animated image to reach a loop start or end, then starts recording this layer's output to a HAP encoded file in the "recordings" folder inside the current project folder. When the whole loop is recorded, the recording will replace the entire layer in-place. This allows recording of performance-hungry layer effects/settings into a new "flattened" video loop.
-
"HAP encode on-the-fly": is shown when the current video source is a non-HAP encoded video. It starts HAP encoding of the layer video while the video keeps on playing. The video is replaced with the HAP encoded version in-place when the encoding is finished. HAP versions get "_hap" appended to their path and are placed in the same folder as the original video. When video stashing is on (see Preferences), the original video will be moved to the stashing directory.
Scene toggle boxes
On the left of each layer stack there are four square boxes labelled 1 through 4. They allow you to select the current scene that plays in the deck (A or B). A scene is a separate set of layers (stack/list) with all its settings preserved when switching. All layers in non-active scenes continue playing (forward, reverse, bounce) in the background like they were, so synchronization is always kept between scenes. Video loading/decompressing is not done on the non-active layers, so they wont strain your system. Keep SHIFT pressed while switching to switch both decks at once.
Main MIDI deck The MIDI control in EWOCvj 2 is split in two separate parts. First, you can learn individual MIDI commands to certain parameters (see 19. Effect box). Second is the main MIDI control deck and individual MIDI control deck settings on the layers. A bit more difficult to explain, a main MIDI control deck is a set of MIDI controls assigned to the main controls of a layer (see 18. Main layer controls), like play speed, play on/off, next frame,... There are four of these sets, labelled A, B, C and D and clicking the main MIDI control deck box will switch between them (or switch them of) for ALL layers of the deck (A or B, thats the layer deck I mean, not the MIDI deck). Individual layer MIDI control deck settings can be done, allowing for instance one layer to follow other/no controls after this. Right-clicking either main MIDI control deck box will allow you to choose “Tune MIDI deck”, opening a new window that allows setting up the current MIDI control deck (so A, B, C or D). So FIRST you set up a certain MIDI control deck here,
Current layer
When hovering the mouse over any of the six displayed layer monitors, this specific layer will become the current layer, visualized by a white rectangle around the image. Non-selected layers have a red border. Main controls and all effects plus parameters for the current layer will be displayed. This hovering is the default behaviour but can be set to leftmouseclicking in the preferences window.
Layer scroll bar
This bar shows the displayed layer numbers and allows scrolling of the layer list when there are more than the displayable three layers in any of the decks A or B. The grey area of the bar displays the layer numbers of the three layers currently displayed and black areas mean space occupied by non-displayed layers. Leftclickdrag the grey area of the scrollbar into the black area and the list of layers will be scrolled left or right one by one. Take care, the bar moves in steps (no continuous movement) so you’ll have to move at least the length of one layer before the bar will be seen moving. You can also leftclick the the black areas to scroll one layer in that direction. A hidden featue is that you can drag content into the black areas without letting go of the left mouse button. Wait a moment and the scrollbar will advance in that direction (to place layers further down the list.
Clip queues
These are used to set up a list/queue of videos/layer files that are loaded into a layer one after the other, each playing once, adding played clips back to the end of the queue, resulting in a looping playback cycle.
The layer overlay HUD has a "downwards triangle" shaped control at the bottom left that, when clicked, opens/closes the clip queue. There is alwways an empty slot at the end of the queue, allowing adding clips. You can also drag content over a layer, which will also temporarily open the queue for insertion.
When the clip queue is open, you can either drag content (layer files, videos, other clips) into the clip boxes, or insert them between boxes (mouse over box edge: lightbluepurple box appears). Rightmouse on a clip box opens a menu that allows loading (multiple) content file(s) into clips from disk (filebrowser opens) or delete the clip. Clips can also be dragged around like other content. Dragging and d^^ropping on an empty area also deletes the clip. Click on an empty area outside the clip queue, and all clip queues will close. Multiple clip queues can be open at the same time.
Do note, you can load normal videos into the queue, but after having been played once, they will reappear at the end of the queue as layer files, so with all their settings included.
Mixmode/wipe
Clicking the box labeled "Mix" will open a two choice menu. Either choose a mixmode or a wipe that will be used to control the way the layer will be combined with the lower layers in the stack. A mixmode will mainly be a mathematical blendmode that constitutes the math that mixes two images. Normal mixing is called “Mix”. When in Mix mode there will be an extra slider called “Factor”: it allows you to locally crossfade between the layer and its lower layers. The other math options I will not explain here, something to try out to get to know them really (I often use Alpha Overlay, Add, Lighten Only and Darken only).
One option is COLORKEY, which allows you to substitute a certain color in the image by the image of the lower layers. When COLORKEY is set, extra controls will appear next to the mixmode box. “Color” will allow you to set the color substituted. Use the color hue wheel (with saturation/lightness triangle) to choose a color or move the mouse over any spot in the window (any) to "eyedrop" the color of that pixel and leftclick to select the color under the mousepointer. This allows selecting from eg. layer monitors. “Tolerance” allows setting how close a color must be to the chosen signature color to be replaced. "Feather" allows fast or slow fading from the original image to the replaced image. Then theres switch “D”, which reverses the direction of the substitution (so a color in the bottom layers is substituted by the current layer instead of the other way around) and “I”, for inverse, which substitutes everything except the selected color. Then, “Displacement” setting will use the layer video to spatially “displace” the bottom layers image.
When wipes are selected you will have a selection of shape-steered wipes with associated directions that can here be used to do shape compositions instead of mathematical mixes. Use the “Factor” slider next to the mixmode/wipe box to travel the wipe between none and full.
Wipes:
- CROSSFADE: Back to the default crossfade mixing.
- CLASSIC: A line travels over the image, showing part of deck A on one side and part of deck B on the other.
- PULL/PUSH: A line travels over the image, pulling in deck A, pushing out deck B.
- SQUASHED: A line travels over the image, squashing the deck images in the available space on either side.
- ELLIPSE: A growing/shrinking ellipse is shown, revealing one deck image, the other deck image on its outside. Select ellipse center by leftclickdragging on the respective deck monitors.
- RECTANGLE: A growing/shrinking rectangle is shown, revealing one deck image, the other deck image on its outside. Select rectangle center by leftclickdragging on the respective deck monitors.
- ZOOMED RECTANGLE: A growing/shrinking rectangle is shown, one deck image zoomed full size inside, the other deck image on its outside. Select rectangle center by leftclickdragging on the respective deck monitors.
- CLOCK: A line through the monitor center rotates, revealing deck B.
- DOUBLE CLOCK: Two perpendicular lines through the monitor center rotate, revealing deck B.
- BARS: Multiple bars horizontal or vertical do a multiple CLASSIC wipe (see above). Set bar divisions by leftclickdragging on the respective deck monitors.
- PATTERN: Multiple boxes horizontal and vertical do a multiple CLASSIC wipe (see above). Set pattern divisions by leftclickdragging on the respective deck monitors.
- REPEL: shows one source in a centered circle, "repelling" the other source that surrounds it.
Main layer controls
When selecting a current layer, its main layer controls will be displayed. The “Speed” slider allows setting a slower or faster video playback speed. The little white line inside the slider box signifies normal speed (x1.0). Rightclick menu on the speed slider allows "locking" speed: speed will stay the same when new content is opened in the layer. Then theres five buttons starting with “<” and ending with “>”. They are respectively: first, move one frame backward (also triggered by left cursor key), second play/pause video backward, third play/pause video bounce, which means it plays the video from start to end and then from end to start and so on, fourth normal play/stop video (also triggered by spacebar) and fifth move one frame forward (also triggered by right cursor key). Fifth, a square, stops the video and displays the layer as transparent. Sixth, "LP" sets if the video continuously loops or not. Then, a toggle that goes from "A" to "B" to "C" to "D" to "off". It chooses the general MIDI sheet for that layer (see "General MIDI").
Second row is the video position/loop bar. Its length is the current video length, the position of the (moving) white line the video position. Leftclicking on the bar will set current video position there. Leftclickdragging allows video/audio scrubbing. (Is your scrubbing not fluid? Read "Video formats and VJ’Ing"); You can select a part of the video duration as "loop" to only display a part of a video. Rightclicking the bar allows to set the current position as loop start (shortcut "L" key) or end (shortcut "P" key); the selected loop is shown as the green part of the bar. Also, when holding CTRL, you can drag the loop ends or the loop body with leftmouse drag. The rightmouse menu also handles loop length matching (this interacts with loopstation loop lengths also):
-
"Copy loop duration": stores the duration of the loop on an internal clipboard.
-
"Paste duration (speed)": changes the layer speed so the duration of the current loop matches the value stored on the internal clipboard (if possible).
-
"Paste duration (loop length)": changes theloop length so the duration of the current loop matches the value stored on the internal clipboard (if possible).
The rightmouse menu also has an option for doing beatmatching of layer playback (full loop). You can set the number of beats/bars layer playback will sync to.
Then there is an option for MIDI learning a control that scrubs the video.
Third row has the opacity slider, changing the opacity of the current layer.
Fourth row, if anything is displayed on it, shows either "Volume" to set the audio volume when playing a video with audio and/or "Upscale", which appears when a video is smaller than the set project resolution (see "Preferences") and does a simple Lanczos upscaling operation on it. Also "Sharpness" then sets the sharpness of the upscaling.
Effects box
Contains all information/controls of the effects list assigned to the current layer. Effects change certain visual aspects of video clips in very different possible ways. Effects are applied in a list, each next effect changing the image already changed by the previous effects. First effect displayed on top off the list. On the bottom of the list (which starts out empty) there is a “+Add effect” box. Click it and an effect choice menu will pop up, first displaying two options: "EFFECT" and "STYLE" respectively displaying effects and AI styles (see "Style room" page). Clicking one of the two displays a list of available options. The effects list first alphabetically lists the "native" effects and then alphabetically adds all plugin effects (of which there are a lot supplied with the installer). EWOCvj2 supports two types of extension plugin standards: ISF and FFGL(2.0+). Any amount of those can be added and used by the user himself. On Windows, ISF plugins must be placed in ProgramData/ISF and FFGL plugins in Documents/ffgl_plugins. Choose an effect to add it to the effect list. For styles, see "Style room". Hover your mouse pointer on the border of an added effect item and an “Insert effect” box will pop up allowing inserting a new effect somewhere in the list.
Click on the name of an added effect to get a menu allowing to change the effect type. Click the small "x" to delete an effect. Click the small "E" to go and edit the mask of that effect (see "Masks"). When a mask is applied a small "M" will appear allowing to toggle the effect mask on/off. Just left of the effect name there are two boxes: the left one being a small dry/wet slider allowing per-effect crossfading between the non-effected image and its effected counterpart, the right one being a simple on/off switch. Most effects have one or more parameters, that change the effect's, well, “effect”. Click a parameter with leftmouse and drag anywhere to change the value. Double-click the parameter to enter a numerical keyboard edit mode. Right-click to assign a MIDI control to the parameter, or reset to the default value.
A list of available effects plus parameters will be added to the documentation later on, for now, experiment! All effects in EWOCvj are being calculated on the GPU.
On the left of the effects box there is a toggle box that toggles between two separate effectcategory streams:
-
"Layer effects": normal effect stream applied onto the layer image.
-
"Stream effects": a compound effect stream, applied on the resulting image of all previous layers combined together up to and including this layer.
This box will be colored green when stream effects are on as a reminder. Also when layer effects are on and there are stream effects in place, the box will be colored red, again, as a reminder. When stream effects are in place and you're in the stream effect view, the current layer image will show the compound after stream effects (instead of only the layer after layer effects).
Masks
Layer images can be masked (a greyscale image spatially controlling the layer opacity), as can the application of each individual effect. Masks are really mask streams, consisting of the same elements that make up a layer stack. So mask streams can contain multiple video/image/source plugin/NDI layers with their own settings and effects. They can even have their own masks, making masks infinitely nestable.
Layer mask triggers:
-
Start masking a layer by clicking the "EM" box on the left of the controls/effects block. The layer stack of its deck will be replaced by the mask stream of the layer, initially consisting of single white SOLID COLOR source ISF plugin. Videos can be loaded, source plugins set, layers added, effects assigned... When masks are applied, a green "M" box will appear above the "EM" button, allowing to turn on/off the mask.
-
Start masking effect application by clicking the blue "E" button in an effect name box. When masks are applied, a green "M" box will appear on the effect name box, allowing to turn on/off the mask.
Mask layers will appear in greyscale instead of color because they set levels of transparency.
On the far right of the mask stream stack (position 3) you can preview the resulting masked video.
Go up one level in the nested mask hierarchy (or return to normal layer stack view) by
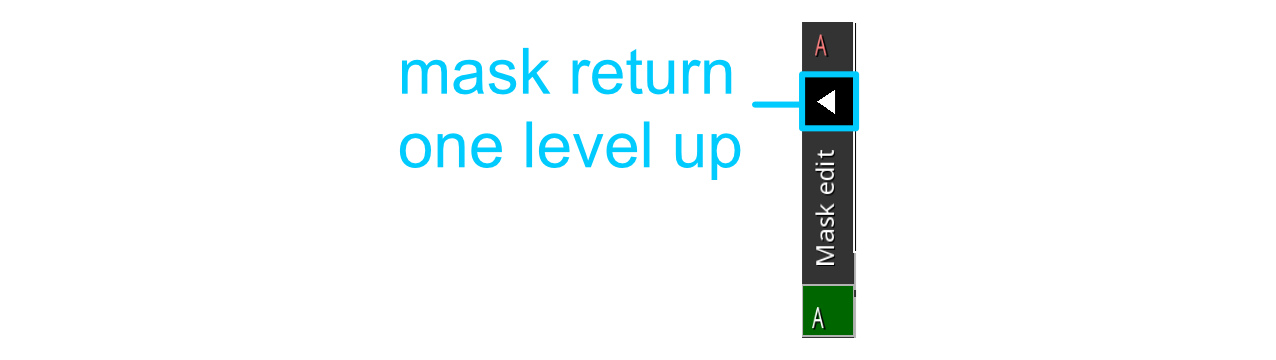
clicking the left-pointing triangle box on the left of the current deck.
Shortcut shelf
Empty on startup. Videos or layer files can be dragged on here from anywhere to create four banks of shortcut media. The media can be dragged anywhere. Launch a content file in a layer by either dragging the content file to a layer monitor, or double leftmouse clicking a shelf item to launch it in the current layer/deck or in the mix. When dragging a layer over from the layer stack, you get the option to insert it either as a layer file (with all settings) or as a plain video or image. Rightclicking an item allows setting a new shelf, saving a shelf as a separate file, opening a shelf file. Also an option to open file(s) into the shelf. A file browser will open. You can then order the files (see above) before adding them sequentially into the shelf, starting from the item that was hovered when initiating the menu. Also when hovering an item, its name (see "Bins room") will be shwon for reference.
Every shelf element has three tiny buttons on the left. One of these is always selected. They set the launchtype of the element:
-
"Restart": every time the element is triggered, its contents are played back from the start.
-
"Continue": the triggered content, when overwritten by, for example, a trigger of another element on the same layer(s), will have its playback position remembered, and at subsequent launches, it will continue on from the position where it was overwritten.
-
"Catch up": the triggered content, when overwritten by, for example, a trigger of another element on the same layer(s), will have its playback position remembered, and, although not displayed, it will keep running in the background. At subsequent launches, it will continue on from the position it is at if it had been running all along.
LIVE MODUS / PREVIEW MODUS
This toggle button shows the current modus and allows switching between the two. The two modi are completely separate streams with their own layer stacks: live modus is meant to be used for performance while preview allows preparing streams/layers/decks without interfering with the main performance stream; this performance stream is generally the one output to eg. a beamer. The performance stream is calculated at the project resolution (see "Preferences") while the preview stream is calculated at one third of that, not to steal away to much processing time or video memory.
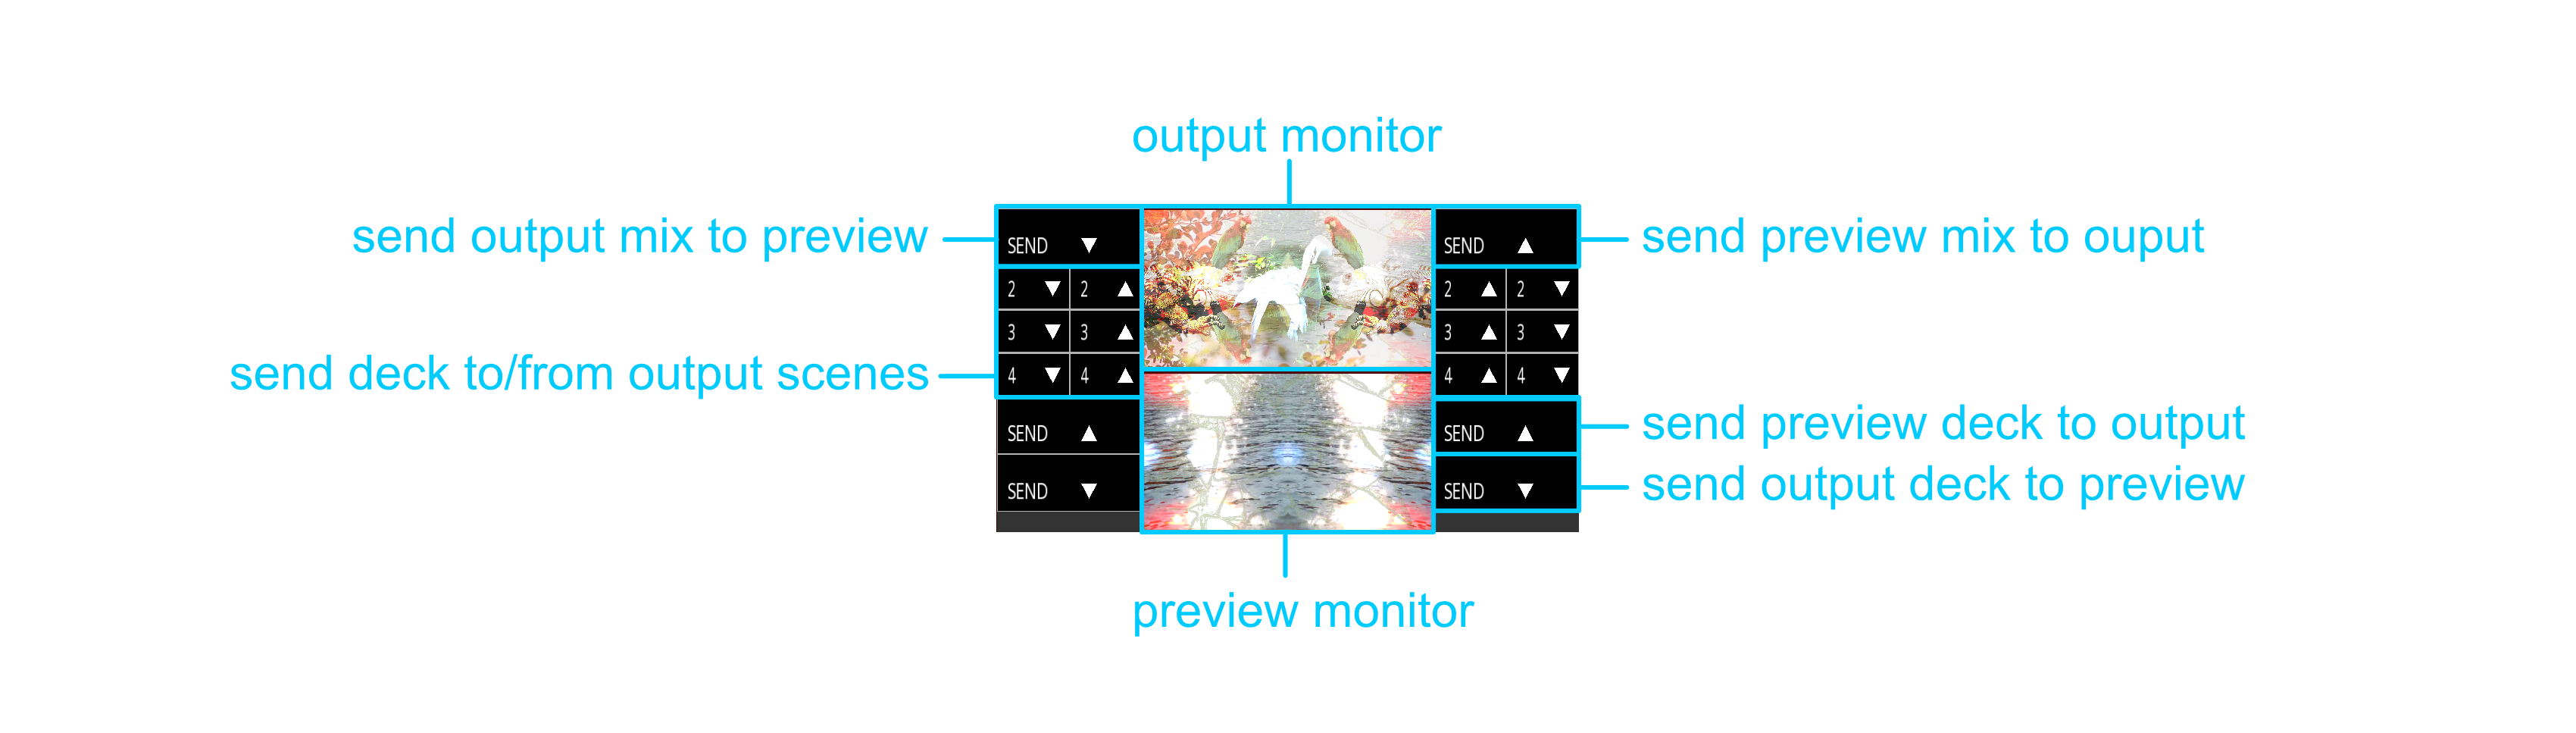
In preview mode, a lot of extra buttons appear next to the performance output monitor, allowing streams to be "sent" from one modus to the other: full mixes and separate decks can be sent, and sending to/from the scenes on the performance stream (preview modus doesnt have scenes itself).
Loopstation
The block on the right of the layer controls/settings block harbours the loopstation. The loopstation allows "recording/automating" eg. parameter values being changed (also buttons, layer scale and pan, wipe xy settings and loop scrub) on recording "lines" and loop those recordings indefinitely after recording them. Choose a loopstation line using the upright rectangular boxes on the far left of it (the current one will be marked white) and click the red circle (shortcut key "R") to start recording. You can record multiple parameters on one line, so go ahead, perform, and click the red circle again ("R") to stop recording. Then click the green circle to start a looping playback cycle of the control snippet you recorded, or the blue circle to play the snippet only once. Clicking these two circles will also end recording first if and when it was running. Preferences have an option to set if, after recording, the current line mark will move to the next element line. Every line also has a color marker: the color of a line will show in the layer stack scrollbar on the layer(s) that contain parameters that are automated by said line. When any content is recorded in a line, a black square will show on the line's color marker. The speed of playback of a line can be set by setting the "LPST Speed" slider. the green area with white marker shows the playback position in the recording and can be used to clickdrag/scrub loop position.
Right mouse menu allows clearing a loopstation line's contents, doing loop length matching (see "Main layer controls"), doing beatmatching (matching loopstation line playback length to a chosen number of beats/bars) and MIDI learning scrubbing the loopstation line loop.
The "beat threshold" slider at the top sets at which volume threshold beat matching kicks in. It uses top volume (mostly the beat kick) measured over a short interval: when this top volume drops below the beat threshold setting, the beatmatched element will grind to a halt, allowing for it to react to intermediary "soft" sections and beat-heavy ones alike.
Deck monitors
All layers in the deck A or B list/stack are combined using the per-layer mixmodes/wipes. The result of these two stacked combinations (A and B) are displayed in their respective deck monitors. When rightclicking the deck monitor a menu appears It allows viewing the monitor view fullscreen or displaying its contents on external connected display devices (do note display devices are not hotpluggable during program execution; you will need to cennect them before running the program). You can also set the monitor image to be sent out through NDI. When this is on, a green "NDI" message flashes on the monitor.When using some of the wipes between layers in the layer stack, certain settings can be adapted for the wipe by leftclickdrag on the deck monitor when the layer with that wipe is current. Namely RECTANGLE, ZOOMED RECTANGLE, ELLIPSE and REPEL allow center of rectangle/ellipse/circle to be set, while for BARS and PATTERN the x and y divisions are changed. Use the Factor slider on the layer to travel the wipe setting from none to full.
Output monitors
In performance mode: one monitor displaying the output stream image after combining the deck monitor images between which you can crossfade using the "Crossfade" slider. In preview mode: two monitors of which the lower one displays the output of the preview streams, and the upper one displays the output of performance mode, which keeps on running during preview. Rightclick menu allows viewing the monitor view fullscreen or displaying its contents on external connected display devices (do note display devices are not hotpluggable during program execution; you will need to cennect them before running the program). This will be where you set up eg. your beamer for outputting your show. You can also set the monitor image to be sent out through NDI. When this is on, a green "NDI" message flashes on the monitor. Also, there are wipe settings (see "Mimode/wipe" above) that dictate the wipe used for combining deck A and B, with Crossfade slider travelling the wipe setting from none to full.
Deck speed sliders
Above the deck monitors you can find the deck speed sliders, they provide an extra level of speed control on the deck level.
Record button
This button, when clicked, starts a recording of a video of the output stream to disk. The file will be in HAP format (watch your disk space!). When clicking the button again (the red circle will be blinking when recording) the recording will stop. Every recording session will go into its own, numbered, video file. When recording ends a small thumbnail file of the latest recording will show next to the record button, allowing dragging the recording like any other content (for reusing your ouput).
Gate to media bins
On the right side of the screen the "BINS" wormgate is shown that can transport you to the media bins screen. Functionality explained in "Wormgates" on the "Bins room" page.
NDI 6
This is a communication standard for realtime sharing of video between NDI capable applications. You can send or receive video streams to eg. other VJ software like Resolume, and even rewire video through virtual webcams. EWOCvj2 allows sending/receiving multiple single layer video monitors ("Select NDI source" and "Toggle NDI ouput"), or sending the content of deck and mix monitors ("Toggle NDI ouput"). This is accomplished by using the rightmouse menus of said element monitors. When sending, a green "NDI" mark will be shown on the said elements. When receiving in a layer, the layer type will show to be "NDI". Don't process to many streams, because there is a clear effect on framerate when sending/receiving. Do note also EWOCvj2 uses NDI version 6 (the latest) and may not be compatible with software that uses older NDI standard versions. Go to https://ndi.video/tools/ to get your hands on the official NDI tools, allowing monitoring and virtual webcam assignment among other things.
Main menus
There are two approaches to accessing the main menu that allows project operations and preferences settings.
First, you can just rightmouse click anywhere on the screen where there are no UI elements ("empty" areas). A menu will open with these options:
-
"New project": pops up a filebrower in which you can set name and location of a new project. A new project will be started.
-
"Open project": pops up a filebrowser allowing you to open the .ewocvj file in a project directory to open that project.
-
"Save project": saves the current project under its current name at its current location.
-
"Save project as": allows saving the current project under a new name and/or at a new location.
-
"Recover autosave": pops up a filebrowser in the current project's autosave folder. Enter any project autosave subfolder and choose the .ewocvj file therein to open an autosaved project snapshot. Saving the project after this will save under the original project name, not the autosave name. Autosave settings in "Preferences".
-
"Clean slate": erases layer stacks, scenes and shelves of the current view. Keeps bins. Keeps content of the non-active modus (being either live or preview).
-
"Preferences": opens preferences, see below.
-
"Configure general MIDI": opens general MIDI assignment settings, see below.
-
"Beatmatch device": pops up a submenu that allows setting the audio input device used for taking input from to steer beatmatching.
-
"Quit": quits the program. A requester will pop up that allows just quitting, quitting after saving the current project at the current timepoint, or cancelling the quit operation.
Second way to enter the main menu is by moving the mouse to the upper screen border. A menubar will appear:
-
"FILE": allows project operations, loading deck and mi files and loading content in specific layers/layer queues.
-
"CONFIGURE": allows preference operations.
-
"ROOMS": allows switching rooms.
-
"HELP": contains a link to the online documentation
Preferences
Choosing this main menu option lands you in the preferences window. At the left are the different prefs categories. Click one to select it:
-
"Project": settings specific to the current project:
-
"Project name": allows renaming your project; filenames on disk will also be changed.
-
"Project output video width": the resolution width used to process video.
-
"Project output video height": the resolution height used to process video.
-
"Project target framerate": the framerate around which this project will try to process at. When resources are limited, actual framerate might be lower.
-
"Seat name": name of your machine's seat when sharing media bins content with other computers (either local or on the internet).
-
-
"Video": default settings regarding video:
-
"Default output video width": the resolution width at which a new project's output width will be set.
-
"Default output video height": the resolution height at which a new project's output width will be set.
-
"Default target framerate": the target framerate at which a new project's target framerate will be set.
-
"Stash HAP encoded videos": will copy/stash the original video files that have been encoded to HAP to a subfolder of your Videos folder.
-
-
"Interface": interface related settings:
-
Select needs click: if on a leftmouse click will be needed to select a layer. If off, selection is done by simply hovering over the layer.
-
Show tooltips: does the program show a tooltip after hovering over an element for some seconds.
-
Long tooltips: when off only tooltip titles will be shown.
-
"Autostart playback by default": autostarts content the moment it is loaded.
-
"Looped playback by default": new layers default to looped playback.
-
"Keep masks on video change": when changing the content file in this layer, the layer mask will be kept.
-
"Keep effects on video change": when changing the content file in this layer, all effects already present will be kept, otherwise the effects list will be cleared.
-
"Loopstation element stepping": when on, at the end of recording a loopstation line, the current line will be set at the next empty line.
-
"Show EWOCvj2 logo text": if you are distracted by the main onscreen EWOCvj2 logo, you can turn it off here.
-
-
"Program":
-
"Undo system": turns the undo system on/off. You can use Ctrl-Z and Ctrl-Y to undo/redo actions. This setting is mainly added to augment performance/responsiveness when preforming live. But nice to have when preparing your sets beforehand.
-
"Autosave": turns autosaving on/off.
-
"Autosave interval (minutes)": the autosave interval in minutes. Edit the value with the keyboard.
-
"Loopstation: always same 8 MIDI controls": when off, every single line on the loopstation will use its unique assigned (see "Genaral MIDI") MIDI control for scrubbing. When on, the same eight MIDI controls will be used all the time, mapped to the visual part of the loopstation list (which can change by scrolling), so the first assigned MIDI value will influence the first visual on-screen line always.
-
"Beat detection minimum bpm": for the program to know the right beat pattern when detecting it, you should set the minimum bpm (beats per minute) here: the program will then always assume the bpm is between this value and double this value. Edit the value with the keyboard.
-
-
"Directories": sets a few folder options:
-
"Projects": the folder used for storing/accessing your projects.
-
"Content root": the folder used for storing/accessing content files, eg. your root video folder.
-
"Generations": the folder used for storing/accessing your AI genrerated videos and images.
-
"Global search": appears when you assign global search folders for the content retargeting system.
-
-
"Input devices": a list of connected MIDI control devices. When connecting a new device, you will need to first activate it here before you can use it. the system will remember the activation state of previously activated devices.
Click save or cancel after making your changes.
MIDI
The MIDI control (controlling program parameters with outboard devices: knobs, sliders, scratchwheels,...) in EWOCvj 2 is split into two separate parts.
First, you can make the program learn individual MIDI commands to control certain parameters/buttons. This is done by rightmouse clicking program elements. when "MIDI Learn" appears in the menu, you can assign a MIDI control to that element by choosing the learn option, then turning/sliding the control you want to use on your MIDI device to assign or rightmouse click to cancel assignment.
Second is the system called "General MIDI". This system consists of a mapping of your MIDI devices to several common controls that's used persistently throughout program use, not depending on your particular project. Choose "Configure general MIDI" in the main menu to set it up. There are four options (top of screen):
-
"Layer controls": sets common layer controls. There are four sets of these, labelled A, B, C and D. Each layer has a green box displaying one of the sets or "off": this enables you to use a certain set/device to control that layer. Under the scene selection boxes to the left and to the right there is a green box that allows selecting a set also. When you set this, all the layers in the layer stack deck will be changed to that setting. Best practice: first set the deck set, then change particular individual layers at will. The layer controls configuration window shows a visual representation of settings (using an MP3 MIDI control deck layout):
-
SPEED: playback speed.
-
ONE: set play speed to normal (x1.0) for sliders that have a “center” MIDI command.
-
FREEZE: pause playback when touching scratch wheel.
-
SCRATCH1: forward/backward wheel movement scratching, when not touching the touchplate.
-
SCRATCH2: forward/backward wheel movement scratching, when touching the touchplate.
-
OPACITY: layer opacity
-
Symbols for PLAY, REVERSE PLAY, BOUNCE PLAY, FRAME BACKWARD, FRAME FORWARD.
-
-
Leftclick a box/circle to enter learning mode. Now move the MIDI control you want to use and it will be set. (Rightclick exits the learn message). Test by using the assigned MIDI control, the respective box in the configuration window should turn green.
-
"Shelf buttons": shows a visual rendition denoting both shelves with their 16 elements. Leftclick a box to enter learning mode. Now move the MIDI control you want to use and it will be set. (Rightclick exits the learn message).
-
"Loopstation buttons": shows a visual rendition denoting the loopstation lines list. Scroll with the triangle boxes. Leftclick a box to enter learning mode. Now move the MIDI control you want to use and it will be set. (Rightclick exits the learn message).
-
"Scene buttons": shows a visual rendition denoting both deck's scene buttons (4 elements each). Leftclick a box to enter learning mode. Now move the MIDI control you want to use and it will be set. (Rightclick exits the learn message).
When you have finished setting up the general MIDI, click either SAVE or CANCEL to continue.